Ubuntu 9.10 dikenal sebagai Karmic Koala, hadir tepat pada tanggal 29 Oktober 2009 dan ini adalah rilis Sistem Operasi Ubuntu kesebelas. Kami telah menyusun tuntunan untuk membimbing mereka yang baru pertama kali menggunakan Linux untuk dapat menginstal Ubuntu 9.10 pada komputer pribadi mereka. Dengan begitu, ini dialamatkan kepada mereka yang baru mendengar Ubuntu dan ingin menginstal dan mencoba Ubuntu tetapi tidak tahu caranya.
The tutorial will make things very simple for you, but if you get stuck somewhere in the middle of the installation and you need help, do not hesitate to use our commenting system at the end of the article!
Panduan ini akan dibuat sederhana, tapi jika anda terhenti di tengah perjalanan instalasi dan memerlukan bantuan, jangan canggung menggunakan sistem komentar di akhir artikel ini!
Requirements:
Keperluan:
You will need the Ubuntu 9.10 Desktop ISO image that corresponds to your hardware architecture (i386 or amd64), and which can be downloaded from here. When the download is over, burn the ISO image with your favorite CD/DVD burning application (Nero, CDBurnerXP, Roxio) on a blank CD at 8x speed.
Anda akan memerlukan sebuah file ISO image Ubuntu 9.10 yang sesuai dengan arsitektur komputer anda (i386 atau amd64), yang dapat didownload di sini. Setelah selesai mendownload, bakar ISO image dengan aplikasi CD/DVD burning favorit anda (Nero, CDBurnerXP, Roxio) pada sebuah CD kosong pada kecepatan 8x.
Reinsert or leave the CD in your CD/DVD-ROM device and reboot the computer in order to boot from the CD. Hit the F8, F11 or F12 key (depending on your BIOS) to select the CD/DVD-ROM as the boot device.
Masukkan kembali CD tadi ke CD/DVD-ROM dan reboot komputer dari CD. Tekan tombol F8, atau F11, atau F12 (tergantung pada BIOS anda) untuk memilih CD/DVD-ROM sebagai tujuan booting.
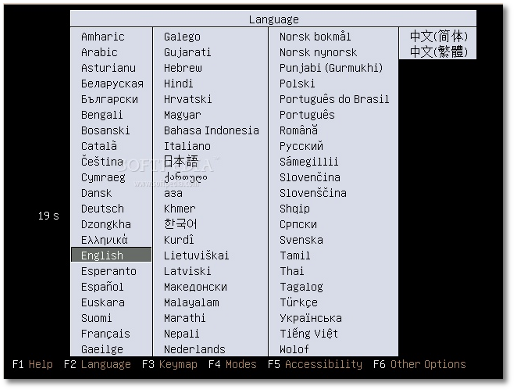
Select your language when asked...
Pilih bahasa yang anda inginkan saat diminta...
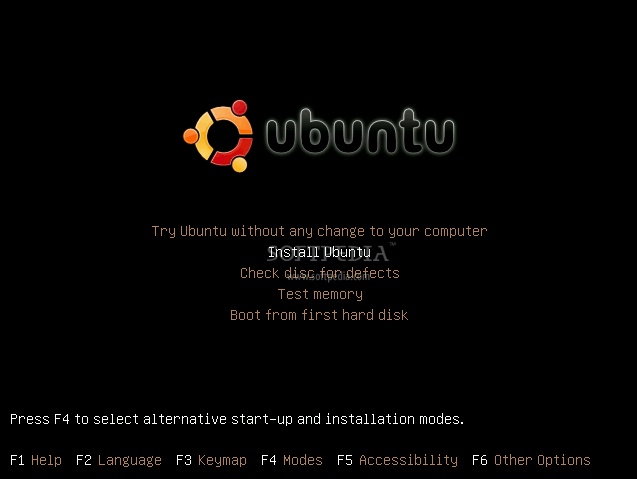
 Select the second option "Install Ubuntu," and hit the "Enter" key...
Pilih pilihan "Install Ubuntu", dan tekan "Enter"...
 Wait for the CD to load into RAM...
Tunggu CD selesai diunduh kedalam RAM...
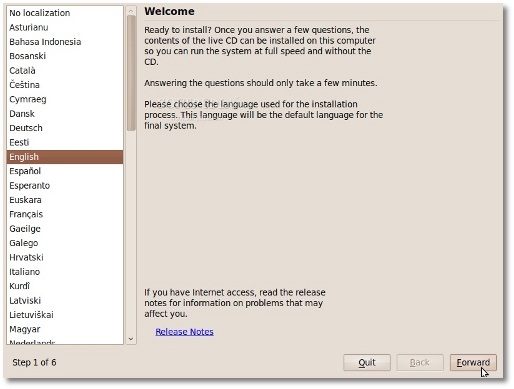
 You will see the wallpaper for a few seconds. When the installer appears, you will be able to select your native language for the entire installation process. Click the "Forward" button to continue...
Anda akan melihat wallpaper tampil beberapa detik. Saat installer tampil, anda dapat memilih bahasa yang akan digunakan saat proses instalasi. Klik tombol "forward" untuk melanjutkan...
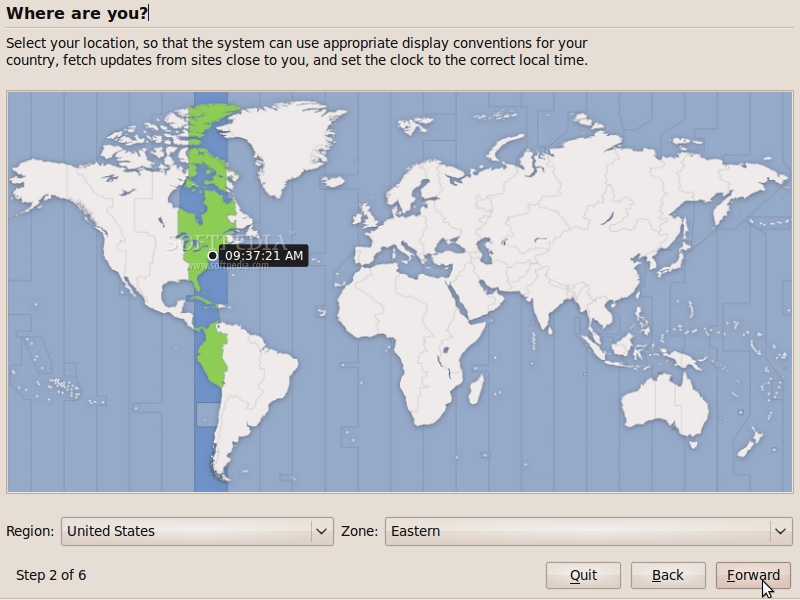
Where are you?
Anda di mana?
The second screen will feature a map of the Earth. Upon the selection of your current location, the time for the final system will adjust accordingly. You can also select your current location from the drop down list situated at the bottom of the window. Click the "Forward" button after you have selected your desired location...
Tampilan layar yang kedua akan tampil peta dunia. Saat memilih lokasi tempat anda berada, waktu akan disesuaikan dengan segera. Anda juga dapat memilih lokasi dari daftar yang berada dibawah tampilan. Klik tombol "Forward" setelah anda selesai memilih lokasi...
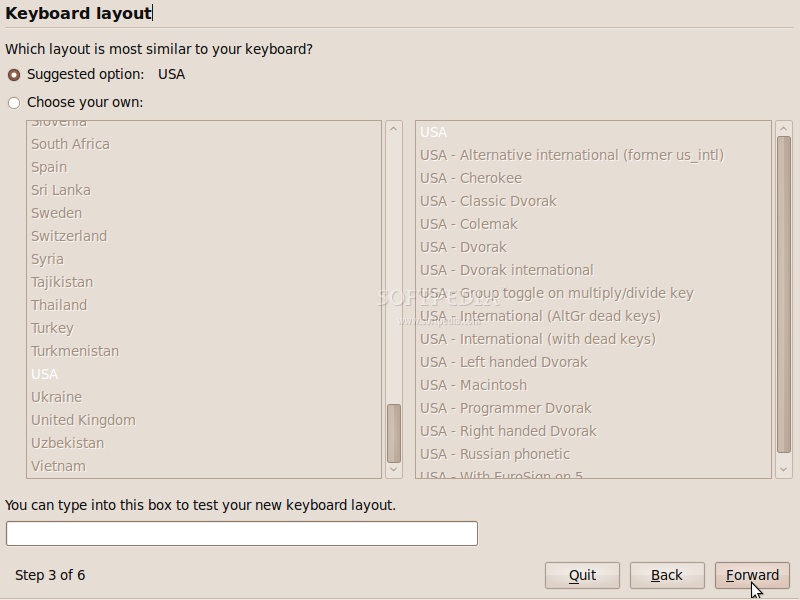
Test your keyboard
Uji keyboard anda
On the third screen, you will be able to choose a desired keyboard layout. But the default automatic selection should work for most of you. Click the "Forward" button when you have finished with the keyboard configuration...
Pada layar ketiga, anda dapat memilih bentuk keyboard anda. Tetapi keyboard yang otomatis dipilihkan biasanya bekerja pada kebanyakan keyboard. Klik tombol "Forward" setelah selesai mengkonfigurasi keyboard...
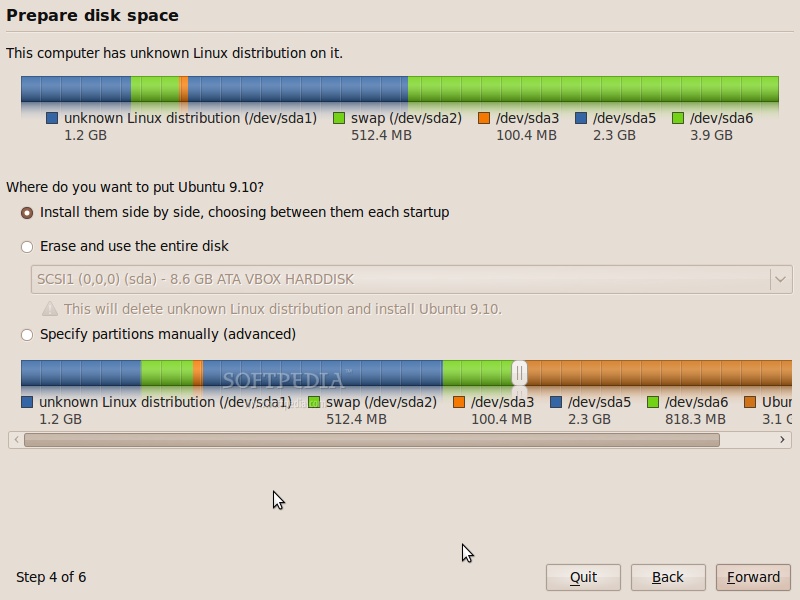
Hard disk partitioning
Mempartisi Hard disk
You have four options here:
Anda memiliki empat pilihan:
1. If you have another operating system (e.g. Windows XP) and you want a dual boot system, select the first option: "Install them side by side, choosing between them at each startup."
1. Jika pada komputer anda terdapat sistem operasi lain (misal Windows XP) dan menginginkan dual boot system (Windows XP dan Ubuntu) dalam satu komputer, pilih pilihan pertama: "Install them side by side, choosing between them at each startup."
Editor's Note: This option will ONLY appear if you have another operating system installed, such as Microsoft Windows. Remember that, after the installation, the Windows boot loader will be overwritten by the Ubuntu boot loader!
Catatan Editor: Pilihan ini HANYA tampil jika pada komputer anda telah terinstal sistem operasi lain, seperti misalnya Microsoft Windows. Ingat, setelah instalasi, boot loader windows akan ditimpa oleh boot loader Ubuntu (GRUB)!
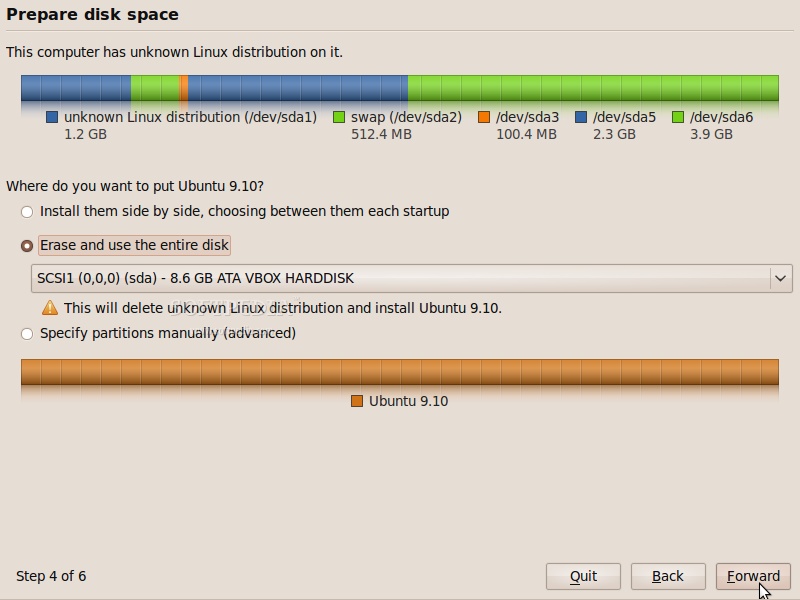
2. If you want to delete your existing operating system, or the hard drive is already empty and you want to let the installer automatically partition the hard drive for you, select the second option, "Use the entire disk."
2. Jika anda menginginkan menghapus sistem operasi yang telah terinstall, atau hard drive memang kosong dan anda ingin installer mempartisi otomatis hard drive untuk anda, pilih pilihan kedua, "Use the entire disk."
Editor's Note: This option is recommended for most users who do not have another operating system installed or who want to erase an existing one, for example Windows OS.
Catatan Editor: Pilihan ini direkomendasikan untuk kebanyakan orang yang belum memiliki sistem operasi terinstal atau mereka yang ingin menghapus sistem operasi, contohnya Windows.
3. The third choice is "Use the largest continuous free space" and it will install Ubuntu 9.10 in the unpartitioned space on the selected hard drive.
3. Pilihan ketiga adalah "Use the largest continuous free space" dan pilihan ini akan menginstal Ubuntu 9.1o pada bagian kosong di hard drive yang anda pilih.
4. The fourth choice is "Specify partitions manually" and it is recommended ONLY for advanced users, to create special partitions or format the hard drive with other filesystems than the default one. But it can also be used to create a /home partition, which is very useful in case of reinstalling the whole system.
4. Pilihan keempat adalah "Specify partitions manually" dan ini direkomendasikan hanya untuk para ahli, untuk membuat partisi khusus atau memformat hard drive. Tapi perangkat ini juga dapat digunakan untuk membuat sebuah partisi /home, yang sangat berguna dalam kasus install u
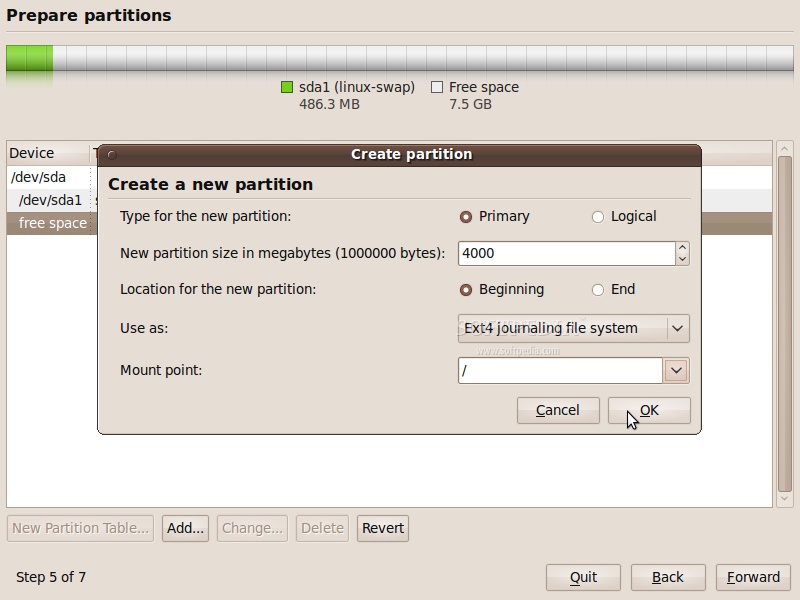
Here's how you do a manual partitioning with /home:
- Select the "Specify partitions manually (advanced) and click the "Forward" button;
- Make sure that the selected hard drive is the right one. /dev/sda is the first physical hard drive. /dev/sdb is the second hard drive in your machine. So, make sure that you know which is the one you want to format! Otherwise, you will lose ALL YOUR DATA on that hard drive;
- Let's say that the selected drive is empty (no other operating system or important data on it), but it has some partitions on it. Select each one of those partitions and click the "Delete" button. After a few seconds, it will say "free space". Do this with the other partitions from the selected hard drive, until they're all deleted and you have a single "free space" line;
- With the "free space" line selected, click on the "Add" button. In the new window, type 2000 in the "New partition size in megabytes" field and select the "swap area" option from the "Use as:" drop down list. Click the OK button and, in a few seconds, you'll notice a "swap" line with the specified size;
- With the "free space" line selected, click on the "Add" button. In the new window, select the "Primary" option, type a value between 10,000 and 50,000 in the "New partition size in megabytes" field and select / as the "Mount point". Click the OK button and in a few seconds, you'll notice an "ext4 /" line with the specified size;
- With the "free space" line selected, click on the "Add" button. In the new window, select the "Primary" option, type a value between 30,000 and 50,000 (or whatever space you have left on the drive) in the "New partition size in megabytes" field and select /home as the "Mount point." Click the OK button and, in a few seconds, you'll notice an "ext4 /home" line with the specified size.
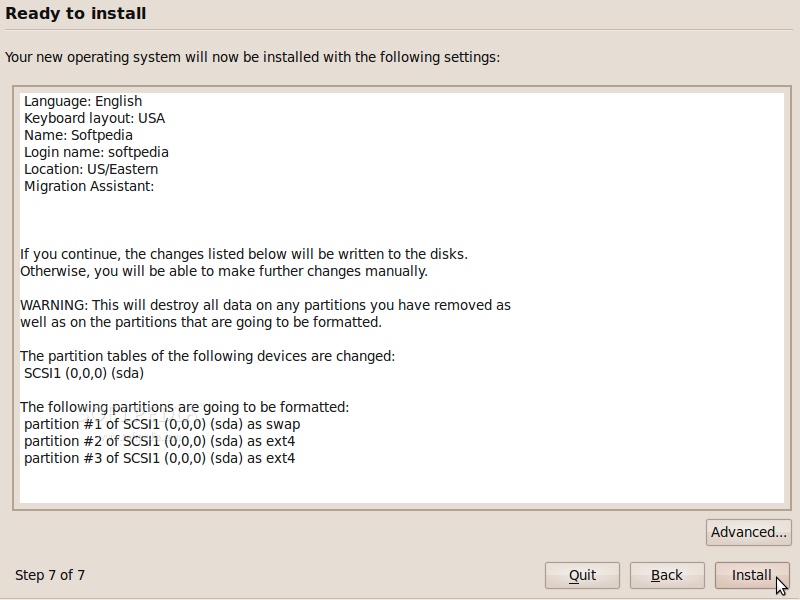
This is how your partition table should look like. If so, click the "Forward" button to continue with the installation...
WARNING: Be aware that all the data on the selected hard drive or partition will be ERASED and IRRECOVERABLE.
Click the "Forward" button to continue with the installation...
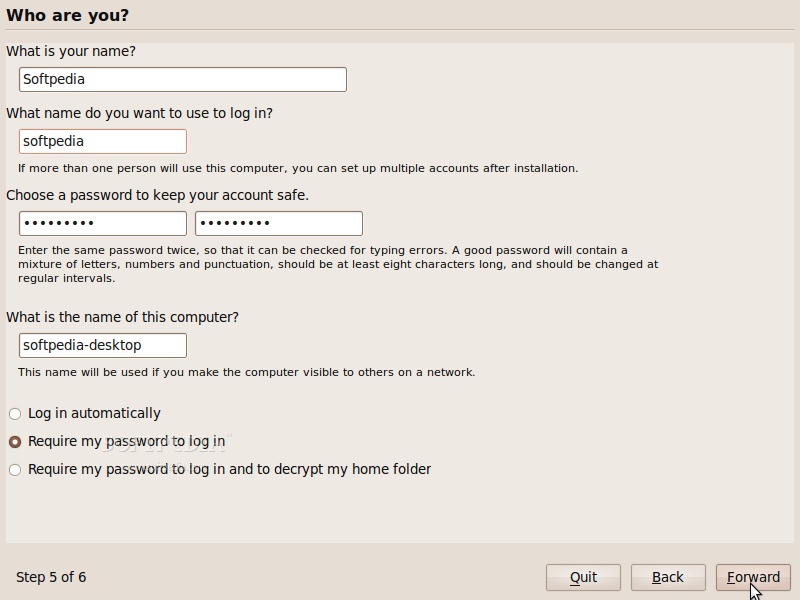
Who are you?
On this screen, you must do exactly what the title says. Fill in the fields with your real name, the name you want to use to log in on your Ubuntu OS (also known as the "username," which will be required to log in to the system), the password and the name of the computer (automatically generated, but can be overwritten).
Also at this step, there's an option called "Log in automatically." If you check the box on this option, you will automatically be logged in to the Ubuntu desktop. Click the "Forward" button to continue...
Are you really ready for Ubuntu?
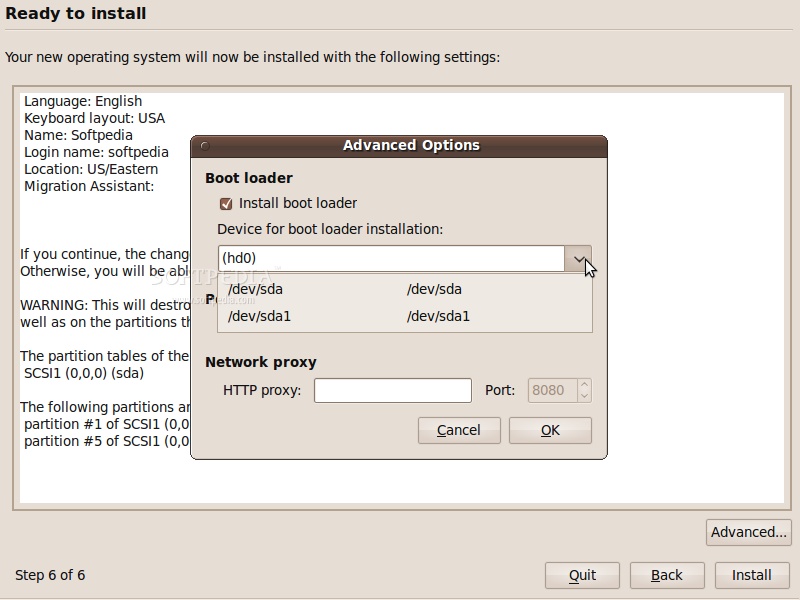
This is the final step of the installation. Here, you can select to install the boot loader on another partition or hard drive than the default one, but it is only recommended for advanced users. If someone is installing to a USB memory stick, as if it was a USB hard drive, then they should know that the installer will mess with their computer's hard disk drive MBR (thanks to Donald for the info on this one!).
Therefore, click the "Advanced" button and select the correct drive (the USB stick in this case)...
Click the "Install" button to start the installation process...
The Ubuntu 9.10 (Karmic Koala) operating system will be installed...
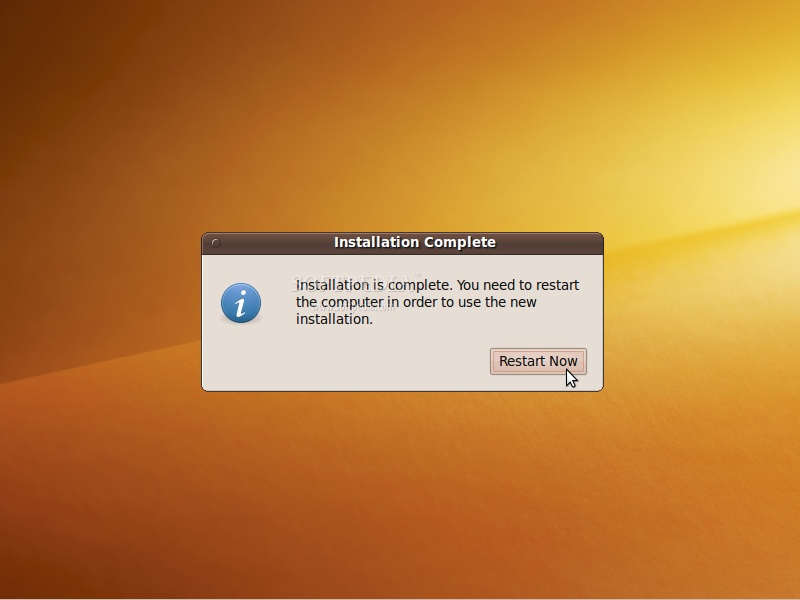
After approximately 10 to 18 minutes (depending on your computer's specs), a pop-up window will appear, notifying you that the installation is complete, and you'll need to restart the computer in order to use the newly installed Ubuntu operating system. Click the "Restart Now" button...
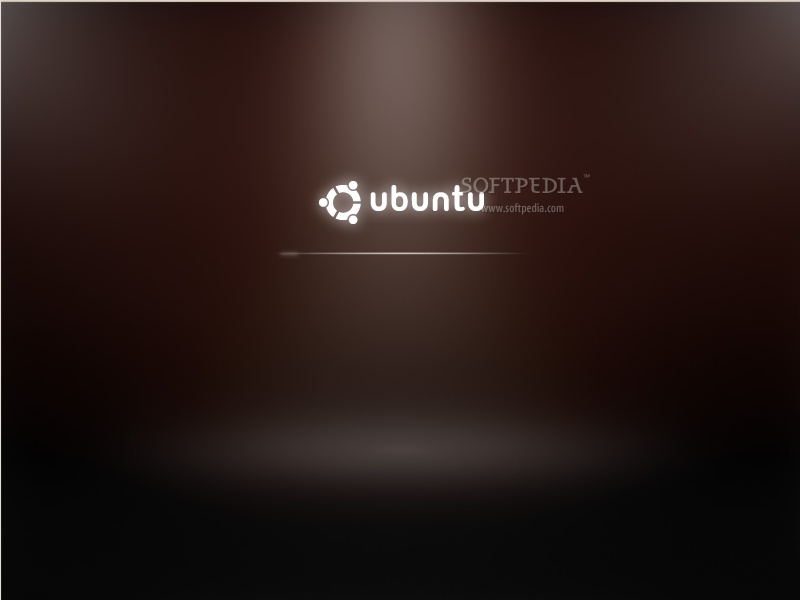
The CD will be ejected; remove it and press the "Enter" key to reboot. The computer will be restarted and, in a few seconds, you will see the Ubuntu boot splash and Xsplash...
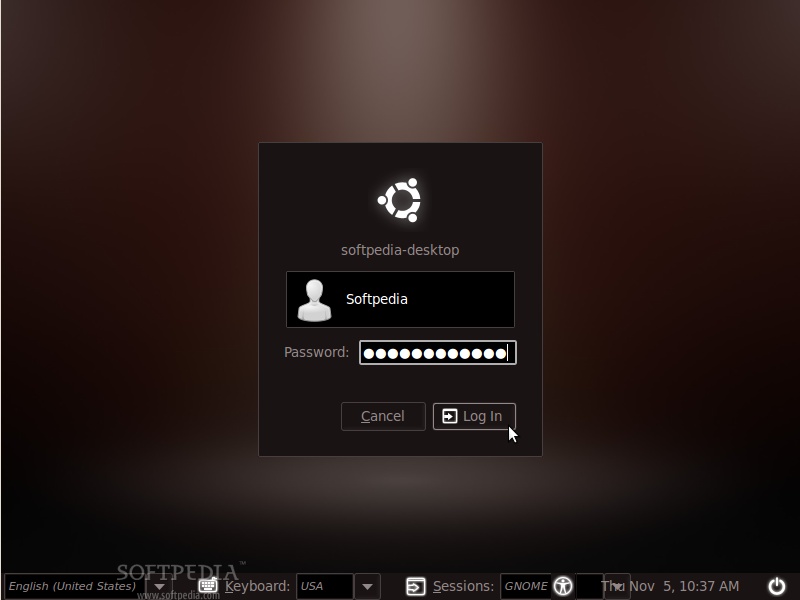
At the login screen, click on your username and input your password. Click Log In or hit Enter...
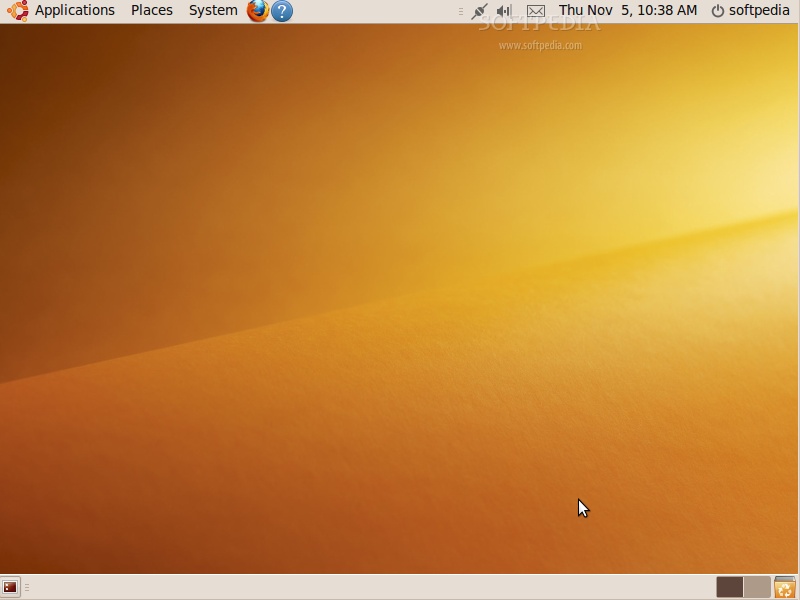
Have fun using Ubuntu 9.10!
The tutorial will make things very simple for you, but if you get stuck somewhere in the middle of the installation and you need help, do not hesitate to use our commenting system at the end of the article!
Panduan ini akan dibuat sederhana, tapi jika anda terhenti di tengah perjalanan instalasi dan memerlukan bantuan, jangan canggung menggunakan sistem komentar di akhir artikel ini!
Requirements:
Keperluan:
You will need the Ubuntu 9.10 Desktop ISO image that corresponds to your hardware architecture (i386 or amd64), and which can be downloaded from here. When the download is over, burn the ISO image with your favorite CD/DVD burning application (Nero, CDBurnerXP, Roxio) on a blank CD at 8x speed.
Anda akan memerlukan sebuah file ISO image Ubuntu 9.10 yang sesuai dengan arsitektur komputer anda (i386 atau amd64), yang dapat didownload di sini. Setelah selesai mendownload, bakar ISO image dengan aplikasi CD/DVD burning favorit anda (Nero, CDBurnerXP, Roxio) pada sebuah CD kosong pada kecepatan 8x.
Reinsert or leave the CD in your CD/DVD-ROM device and reboot the computer in order to boot from the CD. Hit the F8, F11 or F12 key (depending on your BIOS) to select the CD/DVD-ROM as the boot device.
Masukkan kembali CD tadi ke CD/DVD-ROM dan reboot komputer dari CD. Tekan tombol F8, atau F11, atau F12 (tergantung pada BIOS anda) untuk memilih CD/DVD-ROM sebagai tujuan booting.
Select your language when asked...
Pilih bahasa yang anda inginkan saat diminta...
Select the second option "Install Ubuntu," and hit the "Enter" key...Pilih pilihan "Install Ubuntu", dan tekan "Enter"...
Wait for the CD to load into RAM...Tunggu CD selesai diunduh kedalam RAM...
You will see the wallpaper for a few seconds. When the installer appears, you will be able to select your native language for the entire installation process. Click the "Forward" button to continue...Anda akan melihat wallpaper tampil beberapa detik. Saat installer tampil, anda dapat memilih bahasa yang akan digunakan saat proses instalasi. Klik tombol "forward" untuk melanjutkan...
Where are you?
Anda di mana?
The second screen will feature a map of the Earth. Upon the selection of your current location, the time for the final system will adjust accordingly. You can also select your current location from the drop down list situated at the bottom of the window. Click the "Forward" button after you have selected your desired location...
Tampilan layar yang kedua akan tampil peta dunia. Saat memilih lokasi tempat anda berada, waktu akan disesuaikan dengan segera. Anda juga dapat memilih lokasi dari daftar yang berada dibawah tampilan. Klik tombol "Forward" setelah anda selesai memilih lokasi...
 |
Test your keyboard
Uji keyboard anda
On the third screen, you will be able to choose a desired keyboard layout. But the default automatic selection should work for most of you. Click the "Forward" button when you have finished with the keyboard configuration...
Pada layar ketiga, anda dapat memilih bentuk keyboard anda. Tetapi keyboard yang otomatis dipilihkan biasanya bekerja pada kebanyakan keyboard. Klik tombol "Forward" setelah selesai mengkonfigurasi keyboard...
 |
Hard disk partitioning
Mempartisi Hard disk
You have four options here:
Anda memiliki empat pilihan:
1. If you have another operating system (e.g. Windows XP) and you want a dual boot system, select the first option: "Install them side by side, choosing between them at each startup."
1. Jika pada komputer anda terdapat sistem operasi lain (misal Windows XP) dan menginginkan dual boot system (Windows XP dan Ubuntu) dalam satu komputer, pilih pilihan pertama: "Install them side by side, choosing between them at each startup."
 |
Editor's Note: This option will ONLY appear if you have another operating system installed, such as Microsoft Windows. Remember that, after the installation, the Windows boot loader will be overwritten by the Ubuntu boot loader!
Catatan Editor: Pilihan ini HANYA tampil jika pada komputer anda telah terinstal sistem operasi lain, seperti misalnya Microsoft Windows. Ingat, setelah instalasi, boot loader windows akan ditimpa oleh boot loader Ubuntu (GRUB)!
2. If you want to delete your existing operating system, or the hard drive is already empty and you want to let the installer automatically partition the hard drive for you, select the second option, "Use the entire disk."
2. Jika anda menginginkan menghapus sistem operasi yang telah terinstall, atau hard drive memang kosong dan anda ingin installer mempartisi otomatis hard drive untuk anda, pilih pilihan kedua, "Use the entire disk."
 |
Editor's Note: This option is recommended for most users who do not have another operating system installed or who want to erase an existing one, for example Windows OS.
Catatan Editor: Pilihan ini direkomendasikan untuk kebanyakan orang yang belum memiliki sistem operasi terinstal atau mereka yang ingin menghapus sistem operasi, contohnya Windows.
3. The third choice is "Use the largest continuous free space" and it will install Ubuntu 9.10 in the unpartitioned space on the selected hard drive.
3. Pilihan ketiga adalah "Use the largest continuous free space" dan pilihan ini akan menginstal Ubuntu 9.1o pada bagian kosong di hard drive yang anda pilih.
4. The fourth choice is "Specify partitions manually" and it is recommended ONLY for advanced users, to create special partitions or format the hard drive with other filesystems than the default one. But it can also be used to create a /home partition, which is very useful in case of reinstalling the whole system.
4. Pilihan keempat adalah "Specify partitions manually" dan ini direkomendasikan hanya untuk para ahli, untuk membuat partisi khusus atau memformat hard drive. Tapi perangkat ini juga dapat digunakan untuk membuat sebuah partisi /home, yang sangat berguna dalam kasus install u
Here's how you do a manual partitioning with /home:
- Select the "Specify partitions manually (advanced) and click the "Forward" button;
- Make sure that the selected hard drive is the right one. /dev/sda is the first physical hard drive. /dev/sdb is the second hard drive in your machine. So, make sure that you know which is the one you want to format! Otherwise, you will lose ALL YOUR DATA on that hard drive;
- Let's say that the selected drive is empty (no other operating system or important data on it), but it has some partitions on it. Select each one of those partitions and click the "Delete" button. After a few seconds, it will say "free space". Do this with the other partitions from the selected hard drive, until they're all deleted and you have a single "free space" line;
- With the "free space" line selected, click on the "Add" button. In the new window, type 2000 in the "New partition size in megabytes" field and select the "swap area" option from the "Use as:" drop down list. Click the OK button and, in a few seconds, you'll notice a "swap" line with the specified size;
- With the "free space" line selected, click on the "Add" button. In the new window, select the "Primary" option, type a value between 10,000 and 50,000 in the "New partition size in megabytes" field and select / as the "Mount point". Click the OK button and in a few seconds, you'll notice an "ext4 /" line with the specified size;
- With the "free space" line selected, click on the "Add" button. In the new window, select the "Primary" option, type a value between 30,000 and 50,000 (or whatever space you have left on the drive) in the "New partition size in megabytes" field and select /home as the "Mount point." Click the OK button and, in a few seconds, you'll notice an "ext4 /home" line with the specified size.
 |
This is how your partition table should look like. If so, click the "Forward" button to continue with the installation...
 |
WARNING: Be aware that all the data on the selected hard drive or partition will be ERASED and IRRECOVERABLE.
Click the "Forward" button to continue with the installation...
Who are you?
On this screen, you must do exactly what the title says. Fill in the fields with your real name, the name you want to use to log in on your Ubuntu OS (also known as the "username," which will be required to log in to the system), the password and the name of the computer (automatically generated, but can be overwritten).
Also at this step, there's an option called "Log in automatically." If you check the box on this option, you will automatically be logged in to the Ubuntu desktop. Click the "Forward" button to continue...
 |
Are you really ready for Ubuntu?
This is the final step of the installation. Here, you can select to install the boot loader on another partition or hard drive than the default one, but it is only recommended for advanced users. If someone is installing to a USB memory stick, as if it was a USB hard drive, then they should know that the installer will mess with their computer's hard disk drive MBR (thanks to Donald for the info on this one!).
Therefore, click the "Advanced" button and select the correct drive (the USB stick in this case)...
 |
Click the "Install" button to start the installation process...
 |
The Ubuntu 9.10 (Karmic Koala) operating system will be installed...
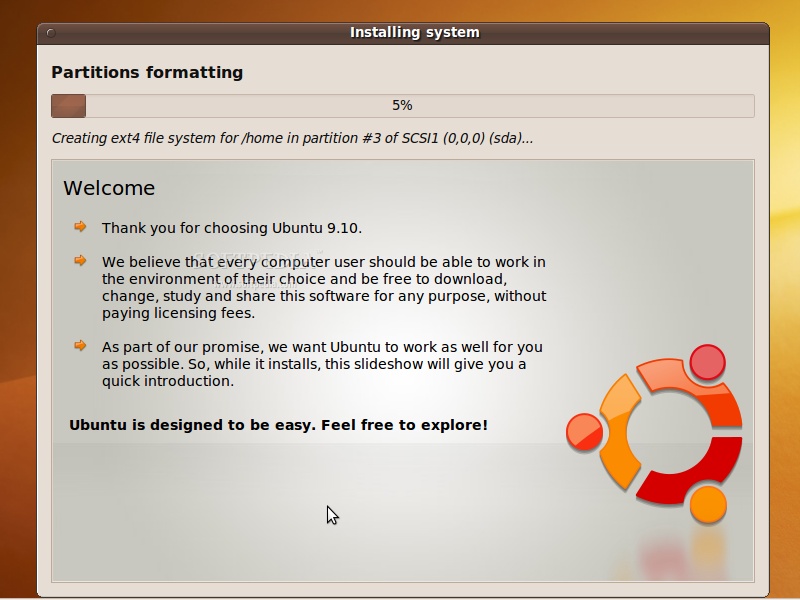 |
After approximately 10 to 18 minutes (depending on your computer's specs), a pop-up window will appear, notifying you that the installation is complete, and you'll need to restart the computer in order to use the newly installed Ubuntu operating system. Click the "Restart Now" button...
 |
The CD will be ejected; remove it and press the "Enter" key to reboot. The computer will be restarted and, in a few seconds, you will see the Ubuntu boot splash and Xsplash...
 |
 |
At the login screen, click on your username and input your password. Click Log In or hit Enter...
 |
Have fun using Ubuntu 9.10!
 |
wow, detail,, thx infonya
BalasHapus